


So you want to learn how to code. But what is a good way to start? There are plenty of options: courses, books, games, some even targeted at children. Yes, Children! If a child can do it, how hard can it be, right?
In this post, we show you the fundamentals you need at the beginning. These fundamentals are mostly the same for any programming language. All programming languages use the same principles: variables, logical operators, decisions, loops and functions. Once you understand these, you will begin to think like a coder.
Coding has, in fact, more to do with logical thinking than with math. For learning to code it’s even more of an advantage to have an affinity for languages. Sure, math skills are relevant for some fields of computer science, but more in the academic realm of data science or machine learning. In their day to day work, programmers usually don’t use more than basic arithmetics. Which supports our claim: even a child can learn programming.
Let’s take a look at the most basic coding concepts: variables, data types and operators. For demonstration purposes, we will use JavaScript, because it is a widely used language. However, these concepts apply to any other language as well. For showing you the fundamentals, it wouldn’t matter which language we used here. This characteristic is called language agnostic.
💡 The word ”agnostic” is derived from ancient Greek for “not knowing”. Hence, language agnostic means “not knowing the specific language”.
Here, the irrelevant programming language in our examples is JavaScript.
Hello World!
You can follow the code examples of this article on Replit.com. Replit.com is an online editor and does not require installation. You can also start your own cloud editor by choosing JavaScript in the footer of the homepage. This is what the user interface looks like:
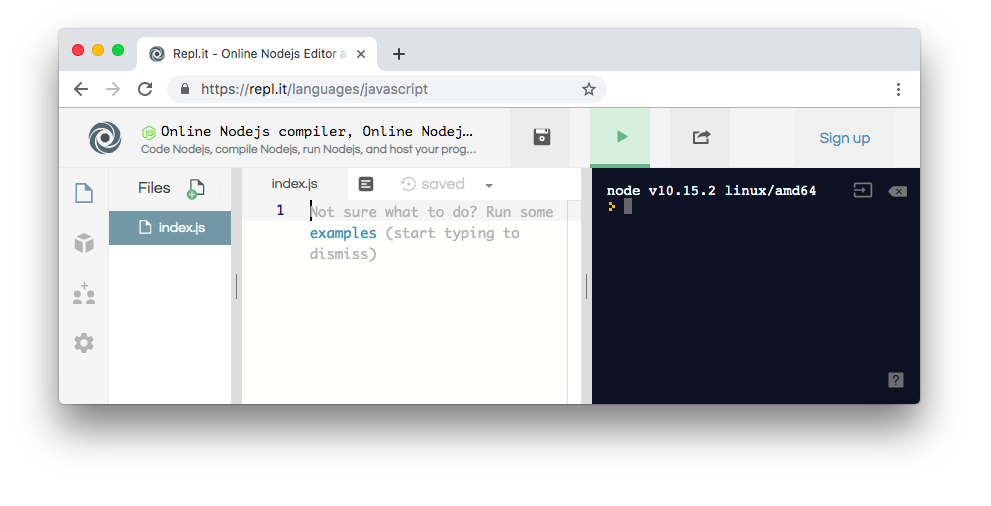
On the left is the input field where we’ll write our JavaScript code. On the right, you’ll see the output. Clicking on the green “run” button at the header’s center will run the program. Try it out by typing the following line into input:
console.log("Hello World!");
This is what should appear in the output on the right:
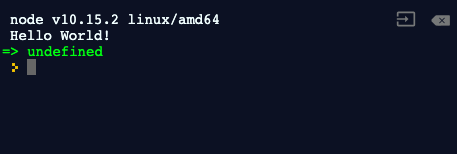
If it looks like this, you did it right. You might wonder what this green undefined is, but simply ignore it for now.
With this short line, you ran the Hello World program. It’s what a programmer always does at the beginning to test a programming language. Check out the Hello World programs of other languages in the extensive Hello-World Collection.
Variables
After we have tested our replit.com editor with the Hello World program, we now define our first variable:
var myname = "Teresa";
console.log(myName);
Running this short command will output Teresa on the right.
You can think of a variable as a box. You put something into the box (in this case Teresa) and label the box (in this case myName). Each time a command (in this case console.log) uses the variable (myName), it’s as if it would use the variable’s content (Teresa). To practice, change the variable’s content or name and see what happens!
You can also join multiple pieces of text together:
var text = "Hello my name is " + "Teresa";
console.log(text);
The output now shows: Hello my name is Teresa. The box of variable text now consists of the text Hello my name is Teresa. The plus sign + in the middle joins both texts together. Note the space after is. Without it, variable text would mistakenly be "Hello my name isTeresa".
In programming languages, texts are called strings. This has to do with a text being a string of characters being put together. A string can have any length, i.e. any number of characters. The content of variable text (Teresa) has a length of 6, because it consists of 6 characters.
String variables can also be joined with other variables:
var myName = "Teresa";
var text = "Hello my name is " + myName;
console.log(text);
This is where it gets interesting. You can change the content of the variable myName, which you may have used several times in your code. With this little change in the variable, the name changes throughout your output. Practice by changing the variable’s content in various ways and check what this does to your output.
The keyword var says: this is a new variable we are creating. Then, at console.log you won’t write out var because the variable already exists.
Data types
A data type is the type of content of a variable. You already know one: string. A string basically is a text, a string of characters put together.
There are other data types as well. You can, for example, use numbers as variables:
var number = 5;
console.log(number);
The variable number here has the content 5. Running the command console.log with the variable will show 5.
This sort of number is called integer. Integers can be positive or negative. You can try it with a negative number: put a negative sign - before 5 and run your code.
You can use decimals, too:
var floatNumber = 2.14;
console.log(floatNumber);
In programming this is called a floating point number, or short float.
Previously, you were using the plus + sign to join strings together. You can also use it to join strings with integers or floating point numbers. You will probably easily recognize what the output of this is going to be:
var myName = "Teresa";
var age = 32;
var text = "My name is " + myName + " and I am " + age + " years old";
console.log(text);
There is one more data type which is very important: true or false. In logic, a statement can be either true or false. This data type is called boolean.
var canCode = false;
console.log(canCode);
Instead of false you could also write true. Try both and see how this changes the output.
Of course you can also join strings with booleans:
var myName = "Teresa";
var canCode = true;
var text = myName + " can code: " + canCode;
console.log(text);
So, why do we have variables? Let’s see what we can do with them, and have a closer look at operators.
Arithmetic Operators
Operators are special characters that we can use in programming languages to do certain operations. There are arithmetic operators like plus +, minus -, multiply *, and divide by /. Then, there are also so-called logical operators, which we’ll explain shortly.
By the way, we already used two operators:
var text = "Hello my name is " + myName;
The equality sign = and the plus sign +. The equality sign = is an assignment operator. It means that the content on the right (in our case: "Hello my name is " + myName) is assigned to the variable on the left (in our case: var text).
The plus sign + is also an operator. But here it is not an arithmetic operator. With strings, + is used as a concatenation operator, which joins several strings or strings and numbers together to form one long string.
With numbers, you use the plus sign + as arithmetic operator. It will add one number to the other. Similarly, you can use the operators minus -, multiply *, divide by /, and modulo %. We will explain what modulo % does in a bit (it does not mean percentage).
Let’s first try them with two integers:
var a = 12;
var b = 5;
console.log("The sum is ", a + b);
The output will be: The sum is 17. The + adds the two integers. In the same way, - subtracts an integer from another. Let’s take our two variables a and b:
var a = 12;
var b = 5;
console.log("The difference is ", a - b);
This is easy, isn’t it? The output will be: The difference is 7.
For practice, try this with *, multiplication. Of course you need to adjust the sentence to read “The product is “. The correct result should be 60. And what do we get by dividing, /, the two?
var a = 12;
var b = 5;
console.log("The quotient is ", a / b);
The result is 2.4. It has a decimal point, so it’s a float! You can also assign the result of the operation to another variable. We’ll call it “ratio”.
var a = 12;
var b = 5;
var ratio = a / b;
The quotient of a and b is a float, so the variable ratio is of the data type float as well. Operations with floats work in the same way as integers. Try it out by changing variables a and b to floats.
That’s much harder to calculate in your head, and we start to see how doing this with a programming language can be of much help. Computers are much better at arithmetic than humans. Experienced programmers usually leave that to the computer. All they need to know is how to express these calculations in their programming language.
The % sign is called modulo. The modulo operator is a bit special. You use it to calculate the remainder of a division.
var a = 12;
var b = 5;
var modulo = a % b;
console.log("The modulo is ", modulo);
In our example, the result is 2. How did we get there? Well, 12 / 5 = 2 with remainder 2. The number 5 fits 2 entire times into 12, and leave 2 not accounted for. The result of the modulo operator is always the remainder. If we changed our variable a to 13, we would get modulo 3.
Conditional Statements and Relational Operators
At some point, you’ll want to create statements which run on conditions. Maybe you have already heard of if-else statements. This is how it works:
var userAge = 21;
if (userAge >= 18) {
 console.log("Have a Beer!");
} else {
 console.log("Have a Soda!");
}
We verify the user’s age. Is the value of the userAge variable greater or equal than 18? If it is, show the toast “Have a Beer!”. If their age is less than 18, meaning the condition is not met, show the toast “Have a Soda!”.
We need the keywords if and else as well as the curly brackets following the keywords. Is a condition met, the program runs the statement in brackets after if (…). Is the condition not met, the program runs any statement after else. Try it out by playing with the value of the userAge variable.
Let’s take a closer look at what’s in the round brackets after the if: userAge >= 18. >= is a relational operator. It means greater or equal than. The other relational operators are:
==    equal to
>=    greater than or equal to
<=    less than or equal to
>     greater than
<     less than
!=    not equal to
The result of a relational operator is either true or false, therefore a boolean. You can save it to a variable as well, which then is of the data type boolean. You will see this if you create a variable comparing a and b:
var a = 12;
var b = 5;
var result = a == b;
console.log(result);
The output is false. This proves our variable result is of the boolean data type.
You can always use variables to store intermediate results. In the if-statement, you can then use this variable. We could write our beer-soda-example like:
var userAge = 21;
var isOldEnough = userAge >= 18;
if (isOldEnough) {
 console.log("Have a Beer!");
} else {
 console.log("Have a Soda!");
}
An if-statement can contain an operation (userAge >= 18) or a variable (isOldEnough). If you use a variable in the if-statement, the variable has to be a boolean. Otherwise, it won’t work.
Logical operators
When writing if-else-statements, we can logically concatenate several conditions. Let’s say in our example, we wanted a teenager, 16 and older, to be allowed to drink beer when a parent is with them. We would express it like this:
var userAge = 17;
var withParentalGuidance = true;
if (userAge >= 16 && withParentalGuidance) {
 console.log("Have a Beer!");
}
The else-command is omitted here for better focus. We’ve concatenated the two conditions (userAge >= 16) and (withParentalGuidance) with an AND-operator (&&). In total, there are three logical operators:
&&    AND
||    OR
!     NOT
The !, you’ve already seen as != (not equal to). AND and OR operators are placed between the two conditions to be concatenated (as shown in our example). It is slightly different with the NOT operator which is placed before the condition to be negated.
With NOT, a statement is logically reversed:
if (!isOldEnough) {
 console.log("Have a Soda!");
} else {
 console.log("Have a Beer!");
}
You can concatenate as many conditions as you like. Brackets aren’t always necessary, but they help–especially at the beginning–to better understand the logic.
Let’s further specify our example from before. If someone is older than 18 OR older than 16 AND with a guardian, they get a beer:
if ((userAge >= 18) || (userAge >= 16 && withParentalGuidance)) {
 console.log("Have a Beer!");
}
When reversing a condition with a NOT operator (!), keep in mind to also reverse any relational operator (>=). For our example (userAge >= 18) is the same as !(userAge < 18).
if (!(userAge < 18) || (userAge >= 16 && withParentalGuidance)) {
 console.log("Have a Beer!");
}
We turned greater or equal than (>=) into less than (<), but not into less or equal than as we want the condition to hold true if userAge is exactly 18.
The opposite of
>=is<
The opposite of<=is>
Put the other way around:
The opposite of
<is>=
The opposite of>is<=
If we now want to define that 16 and 17 year olds are allowed to drink beer with their parents’ permission, but only up to a maximum of 2 beers, how would we express that? It leads us to an additional statement: else if.
if (userAge >= 18) {
 console.log("Have a Beer!");
} else if (userAge >= 16 && withParentalGuidance) {
 console.log("Max 2 beers!");
} else {
 console.log("Have a Soda!");
}
You may write many more else-if-statements than one, but we’ll leave it at that for now.
To practice, try writing a program that has 3 variables and gives an output of the greatest of these three variables. We give you a hint: Within an if you can nest another if into curly brackets:
if (...) {
 if (...) {
   ...
 } else {
   ...
 }
} else {
  ...
}
I prepared the solution to this exercise on replit.com. For any question, join our Slack and ask away. If you have, post a link to your code, so we can help you better.
This has been quite a bit of information! Great job at staying with us! Review the individual operators step by step until you are able to apply them on your own. We will build on this in another post where we’ll discuss loops and functions.